
RTM-Worx User Manual
Simulation
3.3 Running the Simulation
3.3.1 Abort, continue and restart
3.3.2 Resin viscosity and calculation parameters
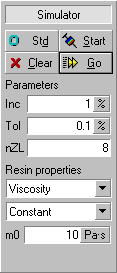
The commands to run the simulation are available in the Simulator Control panel, the [Simulator] menu and through the F9 (continue simulation) and Ctrl-F9 (restart simulation) keys. In addition, the Simulator Control Panel contains the resin properties and calculation parameters.
 |
Ā |
| [Std] resets calculation parameters to their defaults. [Start] clears any results and runs the simulation. [Clear] deletes simulation results. [Go] runs the simulation, continuing from the currently selected time step. | |
| Calculation parameters. You can change them without losing calculation results. Inc is the filling increment in between time steps to save (1% means that 101 snapshots are saved during filling). Tol is the termination criterion for iterative calculations. For the calculation of pressures, this is the relative error allowed in the nodal flow rates. | |
| Here you select resin property to define (top list) and the material model to use for the property. In the isothermal version of RTM-Worx the only resin property is constant viscosity as shown here. | |
| Resin viscosity during injection of the part. | |
| Ā |
![[top]](../asp/tp.gif) 3.3.1 Abort, continue and restart
3.3.1 Abort, continue and restart
You can stop the calculation anytime, and restart at the point where the calculation was stopped, or at another time step. The following table explains the command buttons that are available in the Simulator control panel:
| Button | Menu | Keyboard | Functionality |
|---|---|---|---|
| [Std] | Ā | Ā | Reset Inc and Tol to their defaults. This does not affect the viscosity. Your results are not deleted. |
| [Clear] | Simulator|Clear | Ā | Deletes results from memory and removes results out of the database. Useful if you want to distribute your project files. |
| [Start] | Simulator|Restart | Ctrl+F9 | Clears the results and runs the simulation. Effectively restarts at t=0 when the mold is empty. |
| [Go] | Simulator|Run | F9 | Continue calculation, starting at the time and mold fraction filled currently selected. Use the arrow buttons, or time step field to change this in the Plot selector Control panel. |
When a calculation takes somewhat longer and you are curious, use Esc to stop the simulation. This will update the display and you can take a look at what has happened. Wait until RTM-Worx has finished drawing the display and continue the calculation by pressing F9, or change something and run the simulation afterwards. The table below details some procedures for common tasks.
| What do you want to do? | Procedure |
|---|---|
| Stop the calculation | Press Esc or [Cancel] in the progress dialog. |
| Start calculation from the beginning (t=0) | Choose [Start] in the Simulator Control panel, Simulation|Restart or press Ctrl+F9 |
| Start calculation at some earlier time. | Go to the Plot selector Control panel and use the arrow keys to get at the point where you want to continue the calculation. Press F9, choose Simulation|Run, or return to the Simulator Control panel and click [Go]. |
| Continue calculation without destroying data already calculated. | Go to the Plot selector Control panel and click [End] to make sure that you're at the last time step that was calculated. If the mold is not 100% filled yet, press F9, choose Simulation|Run or click [Go] in the Simulator Control panel to continue the simulation. |
Results from the simulation calculation are automatically saved in the project file. If you modify the geometry or properties or restart the calculation, all results are deleted. This is a good thing, because saving all calculation results will cost a lot of disk space, and a lot of simulation runs will have an exploring character, rather than that they are all milestones. You can save the results together with the current model by choosing Project|Archive. This will create a read-only project file with an ARX extension. It can be read again using the Project|Open command, in which case RTM-Worx creates a WRX file from the archive, with a number added to it.
3.3.2 Resin viscosity and calculation parameters
The resin viscosity is an important parameter for the calculation of pressures, velocities and the resulting filling time. RTM-Worx uses a constant resin viscosity because there is no calculation of temperature or degree of cure that might influence the viscosity. Use the viscosity at the temperature at which it is injected, or a representative temperature when the reinforcement, mold and injection temperatures are different.
The Simulator Control panel contains two parameters to control the simulation: Inc which controls the amount of data saved during the calculation and Tol which is the relative error allowed in flow rates.
| Ā | Description | Default | Remarks |
|---|---|---|---|
| ĀIncĀ | Filling Increment between time steps to save | 5% | Results from the calculation are saved as snapshots during filling. If an increment of 5% is used, the results from 21 steps in time are saved (including 0% and 100% filled). Specify 0% here to save all of the data generated by the simulation. |
| ĀTolĀ | Termination criterion for iterative calculations | 10-3 | The pressures are calculated using an iterative method which is very fast but needs a criterion to stop. This defines the relative error allowed in the nodal flow rates (which is zero for ordinary nodes, and can be prescribed at injection nodes.) |
You can get the default settings by clicking the [Std] command button.
Saving a lot of results by using a small increment 'Inc' will increase the size of the project file considerably and slows down loading and closing the database. If you need high resolution in time (the ability to walk through the filling stage in small time steps to see exactly what happens), use the following procedure:
- Run the simulation with the default time step increment of 5%.
- Stop the calculation at the time you're interested in.
- Change the value for Inc to 1%.
- Continue the calculation with the [Go] command button or the F9 key.
- Stop the calculation when you're past the interesting phenomenon.
- Set Inc back to 5%.
- Continue the calculation with the [Go] command button.
You can also inspect results directly after step (5) and go back to step (3) with an even smaller increment when the time increment is still too large. Note that the size of the time steps taken equals the number of nodes (can be inspected in the Mesh generator Control panel); if you want each step the simulation takes to be saved to the project file, set Inc to zero.
![]()
home |
contents |
about this manual |
quick start |
introduction
installation |
features |
philosophy |
getting started |
interface |
workspace
menu and commands |
viewing the model |
model and calculation
geometry and properties |
mesh generation
© 1997-2022 Polyworx
![[home]](../asp/pwxpwx.gif)